CI/CD with Jenkins & Git Integration
DevOps is basically a culture. You can say software engineering culture. Aim or objective of DevOps is unifying software development (Dev) and software operation (Ops). DevOps is a broad area and it involves many tools at different stages/phases. There are many tools available to implement DevOps.

CI / CD
Continuous Delivery is an approach where teams release quality products frequently and predictably from source code repository to production in an automated fashion.
Some organizations release products manually by handing them off from one team to the next, which is illustrated in the diagram below. Typically, developers are at the left end of this spectrum and operations personnel are at the receiving end. This creates delays at every hand-off that leads to frustrated teams and dissatisfied customers. The product eventually goes live through a tedious and error-prone process that delays revenue generation.

Now, check out the continuous delivery pipeline below. It illustrates how developers write code on their laptops and commit changes to a source code repository and finally it process to production.

Some of the most common terminologies involved in building efficient CI/CD pipelines across various SDLC projects:
- Continuous Integration
- Continuous Delivery
- Continuous Deployment
- Source Control Management (SCM)
Let us understand what happens in each of the above stages:
- Continuous Integration
- Building Software implementation in a ‘Development’ environment.
- Performing Continuous Dev Testing such as:
- Unit Testing
- Layout Testing
- Continuous Delivery
- Deploying every developed build on the ‘Staging’ environment.
- Performing Continuous Automated Testing such as:
- Integration Testing
- Visual Testing / Screenshot Testing
- System Testing (End to End Testing)
- Acceptance Testing
- Continuous Deployment
- Deploying every build on ‘Production’ environment automatically, after passing all tests in Development and Staging environments
- Source Control Management (SCM)
- Contains all the developed source code of the project
- Maintains all the current and past state of the code/project
Source Control Management is also referred to as Version Control Software (VCS) and Revision Control System (RCS). While there are several source control management tools available in the industry, Git is the most popular and widely used one as of date, while there are others like SVN, TFS, Mercurial, CVS as well.
Key Element CI process
Here, are the key elements which you need to perfom the entire CI process:
- Version Control System (VCS): It offers a reliable method to centralize and preserve changes made to your project over time.
- Hosted CI Tool Solutions: To avoid servers or virtual machines, you should go for hosted CI tool solutions. This tool helps in the maintenance of the whole process and offers easier scalability.
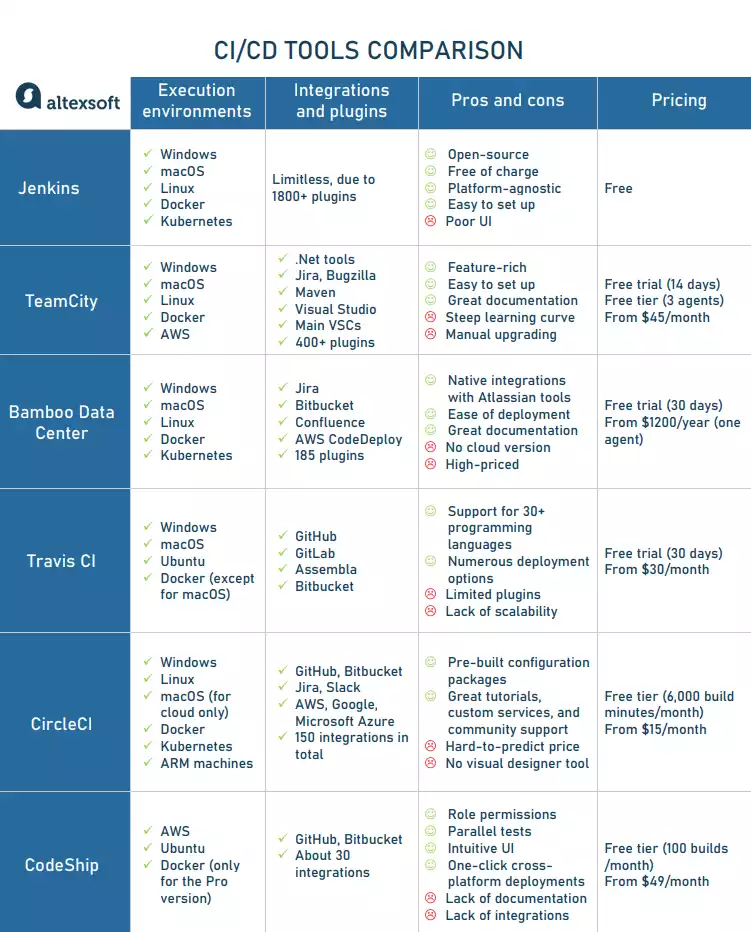
- Tools: If you select a self-hosted variant, you will need to install one of the many CI tools like Jenkins, TeamCity, Bamboo, GitLab, etc.
| Development without CI | Development with CI |
| Lots of Bugs | Fewer bugs |
| Infrequent commits | Regular commits |
| Infrequent and slow releases | Regular working releases |
| Difficult integration | Easy and Effective Integration |
| Testing happens late | Continuous Integration testing happens early and often |
| Issue raised are harder to fix | Find and fix problems faster and more efficiently. |
| Poor project visibility | Better project visibility |
How does Continuous integration work?
The software was built and tested as soon as a developer committed code. If any error is detected, the respective developer can quickly fix the defect.

Jenkins
Jenkins is an open-source, extensible automation server for implementing continuous integration and continuous delivery. You can integrate Salesforce DX with Jenkins framework to automate Salesforce deployment.
Jenkins is a widely used application around the world that has around 300k installations and growing day by day. By using Jenkins, software companies can accelerate their software development process, as Jenkins can automate build and test at a rapid rate.
In simple words, Jenkins Pipeline is a combination of plugins that support the integration and implementation of continuous delivery pipelines using Jenkins.
The pipeline as Code describes a set of features that allow Jenkins users to define pipelined job processes with code, stored and versioned in a source repository. … To use Pipeline as Code, projects must contain a file named Jenkinsfile in the repository root, which contains a “Pipeline script.”

The table below shows the comparison between “Before and After Jenkins”.
| Before Jenkins | After Jenkins |
|---|---|
| The entire source code was built and then tested. Locating and fixing bugs in the event of build and test failure was difficult and time-consuming, which in turn slows the software delivery process. | Every commit made in the source code is built and tested. So, instead of checking the entire source code developers only need to focus on a particular commit. This leads to frequent new software releases. |
| Developers have to wait for test results | Developers know the test result of every commit made in the source code on the run. |
| The whole process is manual | You only need to commit changes to the source code and Jenkins will automate the rest of the process for you. |
Core Concepts of Jenkins:
1. Project / Job
A Project or a Job is a collection of configurable instructions used for building developed source code, testing, collecting artifacts, sending notifications in emails, deploying in required environments, and much more.
2. Pipelines
A Jenkins pipeline is set of instructions and build steps configured in Jenkins to run all the processes in multiple environments in various steps.
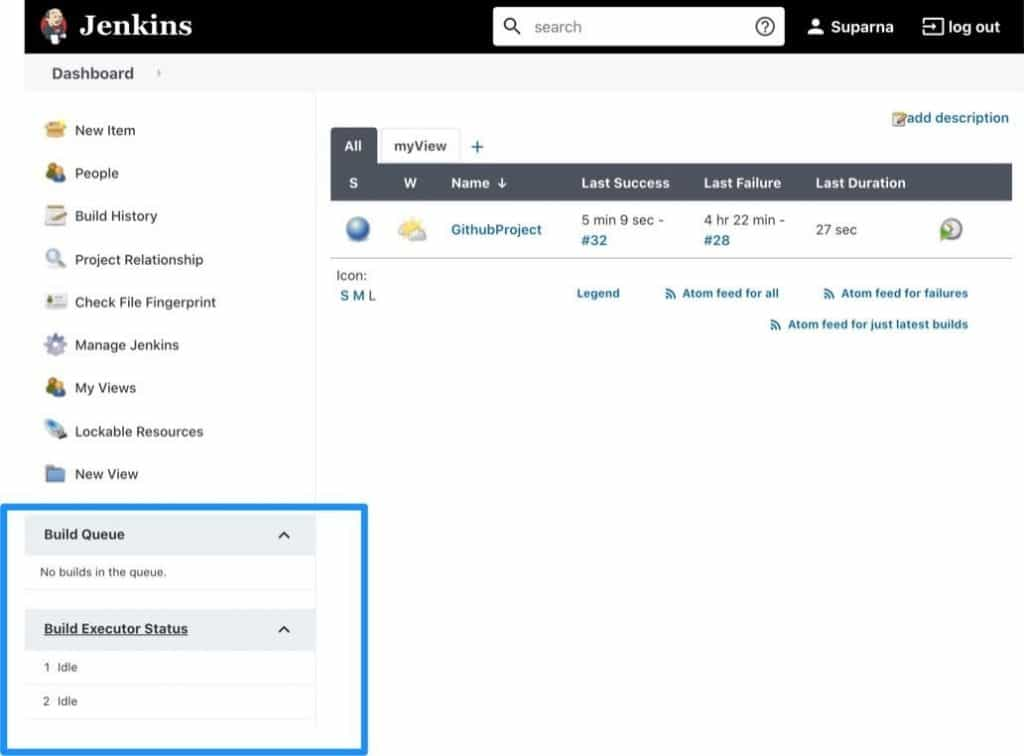
3. Build Queue and Build Executor Status
- Build Executor Status
- Build Queue
4. Plugins
More than 1500 community-contributed plugins in Jenkins support building software varieties, automate tests, and deploy projects for production releases.
5. Master – Agent
Executes in remote parallel machines for shorter build and test running time using additional resources in the cloud.
- The master node is usually the machine where Jenkins is configured to be running.
- Agent nodes are generally the other machines that receive instructions from the Master node to help the executions run and finish faster in parallel.
Main selling points
- No expenses required. Jenkins is a free CI/CD tool and that can save you money on the project.
2. Limitless integrations. Jenkins can integrate with almost any external program used for developing applications. It allows you to use Docker and Kubernetes out-of-the-box.
3. A rich library of plugins is available with Jenkins: Git, Gradle, Subversion, Slack, Jira, Redmine, Selenium, Pipeline, you name it.
4. Active community. The Jenkins community provides a guided tour to introduce the basics and advanced tutorials for more sophisticated use of the tool. They also hold an annual conference DevOps World | Jenkins World.
Main weaknesses
- Documentation isn’t always sufficient. For instance, it lacks info on pipeline creation. This adds time-consuming tasks to the list, as engineers have to work through them.
2. Poor UI. Its interface seems a bit outdated as it doesn’t follow modern design principles. The absence of whitespaces makes the views look crowded and confusing. A lot of the progress features and icons are super pixelated and don’t refresh automatically when jobs finish.
For more information about Jenkins , Check out https://www.jenkins.io/
Git
It is a version control system. It helps and allows engineers to track changes in the file. Key features of Git include moving or adding files, ignoring certain files, branches, checking statues of the changes, finding version that introduced a bug using Binary Search.
What can be done with Git?
- Simplified rollbacks
- Removes Reliance on Sandbox as the Single Source Of Truth/ Backup
- Maintain and Track Audit Trails
- Enable Parallel Development streams, safely
- Automated Deployments
- Pulling requests are an option on GitHub. You can copy the code to your local machine, make changes, and then push the updated version back to the main branch
Version Control is the management of changes to documents, computer programs, large websites and other collection of information.
There are two types of VCS:
- Centralized Version Control System (CVCS)
- Distributed Version Control System (DVCS)
Centralized VCS
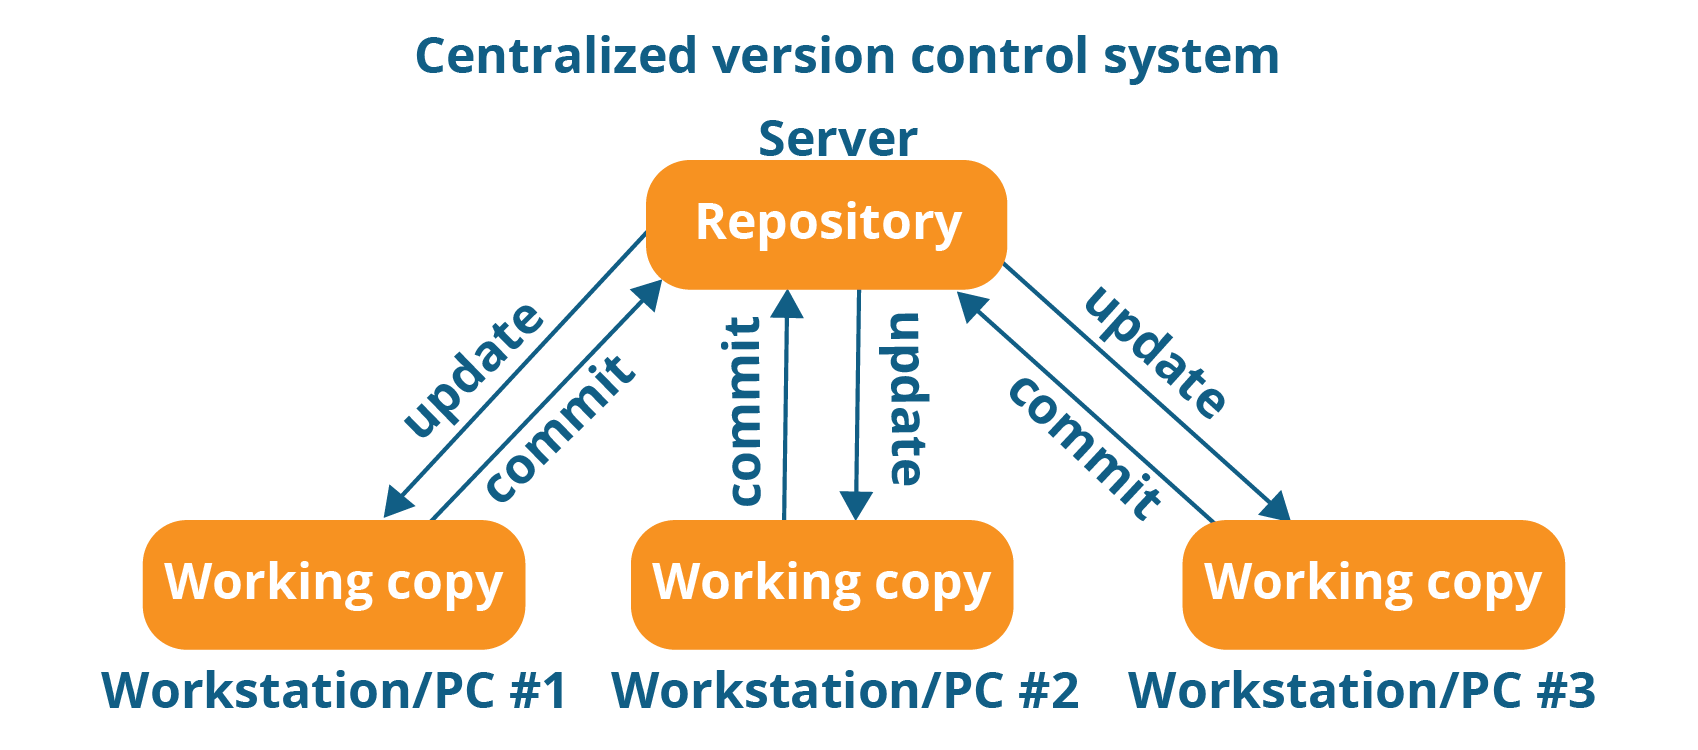
A centralized version control system (CVCS) uses a central server to store all files and enables team collaboration. It works on a single repository to which users can directly access a central server.
Please refer to the diagram below to get a better idea of CVCS:
Distributed VCS
These systems do not necessarily rely on a central server to store all the versions of a project file. In Distributed VCS, every contributor has a local copy or “clone” of the main repository. Here everyone maintains a local repository of their own which contains all the files and metadata present in the main repository.
You will understand it better by referring to the diagram below:
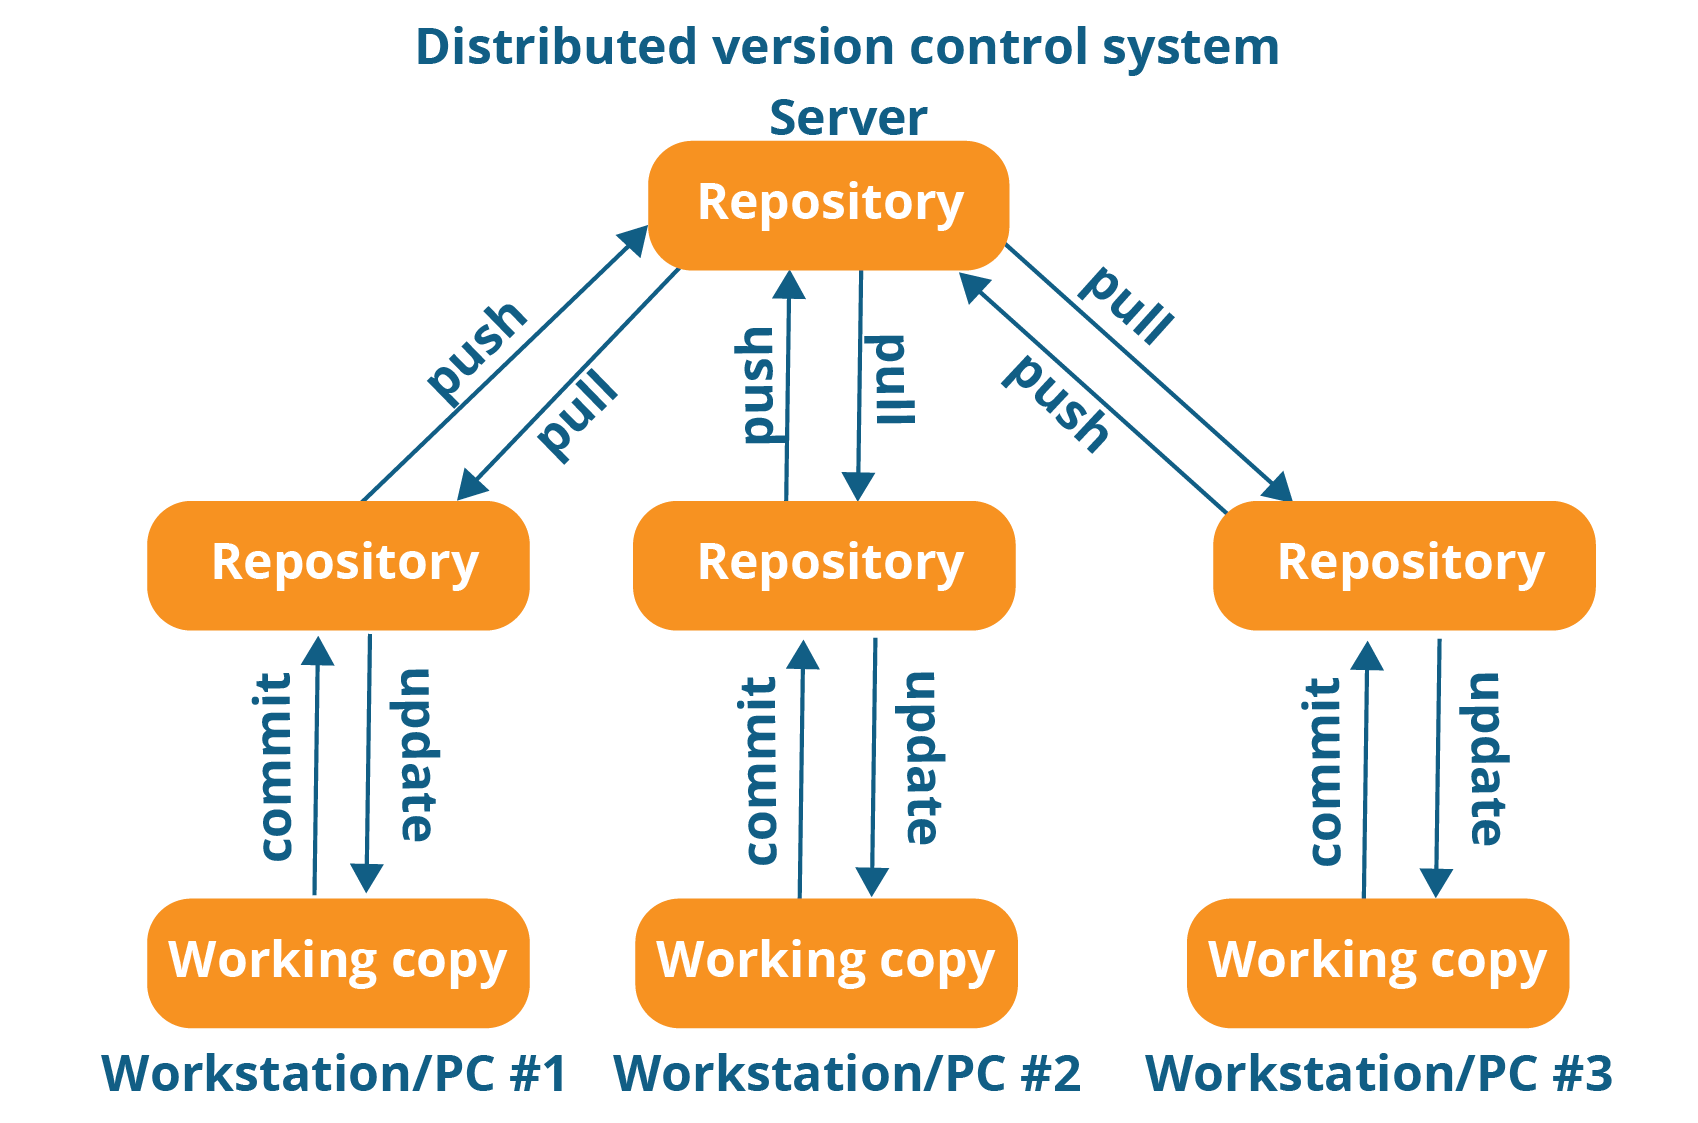
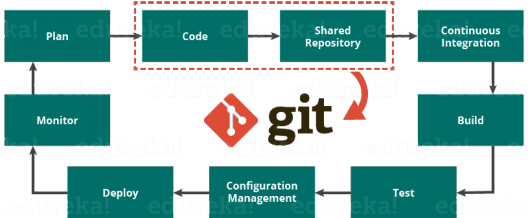
- Git is a distributed version control tool that supports distributed non-linear workflows by providing data assurance for developing quality software. Tools like Git enable communication between the development and the operations team.
Jenkins and Git are used together
As discussed earlier, Git is a source control manager. That is where you keep your source code for tracking all the code changes that happen over time and to baseline the versions when they are ready for release.
Jenkins, on the other hand, is a continuous integration solution. It is devised to automate most of the tasks that a developer has to do while developing a new application (code quality checks, building, archiving of build artifacts, integration testing, deployment to various environments, etc.) Without a CI solution, a developer has to spend much time doing these repetitive non-productive tasks.

Advantages:
- Git and Jenkins are both very powerful, but with great power comes great responsibility. It’s pretty common to justify an unnecessary amount of complication in a build pipeline simply because you can.
- While Jenkins has a lot of neat tricks up his sleeve, it is easy to leverage the features of Git, as it makes release management and bug tracking significantly easier over time.
- We can do this by being careful about the versions of code that we build and tagging them appropriately. This keeps release-related information close to the code, as opposed to relying on Jenkins build numbers or other monikers.
- Protecting Git branches reduces the risk of human error, and automating as many tasks as possible reduces how often we have to pester (or wait on) those humans.
Setup Salesforce deployment Using Jenkins
Step 1) Install Jenkins and Customize Jenkins
First Setup is download Jenkins and installed it on your machine or AWS server where you want to use this.
Step 1.1) Download Jenkins from here.
Step 1.2) Go to download location from local computer and unzip the downloaded package.
Double-click on unzipped jenkins.msi. Then Start installation.

Step 1.3) After completing the Jenkins installation process, a browser tab will pop-up asking for the initial Administrator password. To access Jenkins, you need to go to browse the following path in your web browser. The initial Administrator password should be found under the Jenkins installation path.

Customize Jenkins
You can also customize your Jenkins environment by below-given steps:
Step 1.4) Click on the “Install suggested plugins button” so Jenkins will retrieve and install the essential plugins.
Note: You can choose the Option “Select Plugins to Install” and select the plugins you want to install
Step 1.5) After all suggested plugins were installed, the “Create First Admin User” panel will
show up. Fill all the fields with desired account details and hit the “Save and Finish” button.

Congratulations! We have successfully installed a new Jenkins Server. Hit the “Start using
Jenkins” button.
Step 2) Installation of Plugins in Jenkins
Jenkins comes with a pretty basic setup, so you will need to install the required plugins to enable respective third-party application support.
GitHub is a web-based repository of code which plays a major role in DevOps. It provides a
common platform for multiple developers working on the same code/project to upload and
retrieve updated code, thereby facilitating continuous integration.
You need not install a GitHub plugin if you have already installed the Git plugin in response to
the prompt during the Jenkins’ installation setup
Following is a step by step process on how to Install Git plugin in Jenkins:
Step 2.1: Click on the Manage Jenkins button on your Jenkins dashboard:
Step 2.2: Click on Manage Plugins:

Step 2.3: In the Plugins Page
- Select the GIT Plugin and custom tool plugin.
- Click on Install without restart. The plugin will take a few moments to finish downloading
depending on your internet connection, and will be installed automatically. - You can also select the option Download now and Install after restart button. In which plugin is installed after restart.
- You will be shown a “No updates available” message if you already have the Git plugin installed.
Step 3) Install Salesforce CLI
Now you need decide which tool you want to use for Salesforce Deployment. You can use ANT tool or you can use Salesforce DX for Salesforce Deployment. Here is link to Download the Salesforce CLI.
Step 4) Setup JWT Flow to Integrate Jenkins with Salesforce
Create a Self-Signed SSL Certificate and Private Key to setup the JWT Flow.
Step 4.1) Download the Open SSL
Download the Open SSL from your here.
Step 4.2) Create a private key and self signed certificate
Execute below command to create the a private key and self signed certificate.
- Set OPENSSL_CONF path
set OPENSSL_CONF=C:\openssl\share\openssl.cnf - Generate an RSA private key :
openssl genrsa -des3 -passout pass:x -out server.pass.key 2048 - Create a key file from the server.pass.key file :
openssl rsa -passin pass:x -in server.pass.key -out server.key - Request and generate the certificate :
openssl req -new -key server.key -out server.csr - Generate the SSL certificate:
openssl x509 -req -sha256 -days 365 -in server.csr -signkey server.key -out server.crt
Step 5) Create Connected App for JWT-Based Flow
Now it time to setup the connected app in Salesforce for Jenkine Deployment.
Step 5.1) Created Connected App
- Created Connected App
- Callback URL
http://localhost:1717/OauthRedirect - Use digital signatures To upload your server.crt file.
- Callback URL
- Edit policy and select “Admin approved users are pre-authorized“.
- Assign Connected App to user or System Admin profile.
Step 5.2) Validate Authorize an Org Using the JWT-Based Flow
Execute below command to validate the authorization for an org using JWT-based flow.
sfdx force:auth:jwt:grant --clientid {ADD_YOUR_CLIENT_ID} --jwtkeyfile server.key --username amit.salesforce21@gmail.com --instanceurl https://login.salesforce.com --setdefaultdevhubusername- –clientid :- provide Consumer Key
- –jwtkeyfile :- Absolute path to the location where you generated your OpenSSL server.key file
- –instanceurl :-provide instanceurl if you are using sandbox.
- –setdefaultdevhubusername :- Set Default dev hub User Name.
Once Authentication is successful then you are ready for final configuration.
Step 6) Configure the Jenkins environment Variable
- Configure the the Server.key in the credential plugins.
- Set Environment variable:-
- HUB_ORG_DH:- The username for the Dev Hub org, such as amit@gmail.com
- SFDC_HOST_DH:- The login URL of the Salesforce instance that is hosting the Dev Hub org. The default is https://login.salesforce.com
- CONNECTED_APP_CONSUMER_KEY_DH :- The consumer key that was returned after you created a connected app in your Dev Hub org.
- JWT_CRED_ID_DH:- The credentials ID for the private key file that you stored in the Jenkins Admin Credentials interface
- Install the Custom Tools Plugin into your Jenkins console, and create a custom tool that references the Salesforce CLI
The names for these environment variables are just suggestions. You can use any name as long as you specify it in the Jenkinsfile.
Step 7) Configure the Jenkins
- Add New Item. Then provide the project name and select type of project as Multibranch.

- Add Source and provide repository URL.You can use URL as sample.https://github.com/amit-salesforce/SFDXProject

- Start a build
CI / CD Tools Comparision
Difference between Copado and Jenkins
Copado is a latest tool used on Saas platform recently came into Salesforce market with easy deployment features.
| Copado | Jenkins |
| Platforms Supported: Saas & Web | Platforms Supported: Windows, Mac & Linux |
| DevOps teams in need of a Value Stream platform for Salesforce | Software development teams searching for a solution to improve the quality of their projects |
| Online Support available | No Support |
| No API offers | Offers API |
| Pricing : 10K USD/Year | Pricing : No |
| Started in 2013 | Started in 2004 |